Saturday, 6 October 2012

DECLUTTER: Plastic Bag Storage

My boyfriend calls me a hoarder when it comes to plastic bags. I would show you my pile but it's simply too inconvenient for me to take our everything. Haha.

I have 3 stacks: lousy plastic bags (i.e. popular, daiso, orange plastic bags), generic paper bags (harder to store) and good paper bags (pretty ones!)
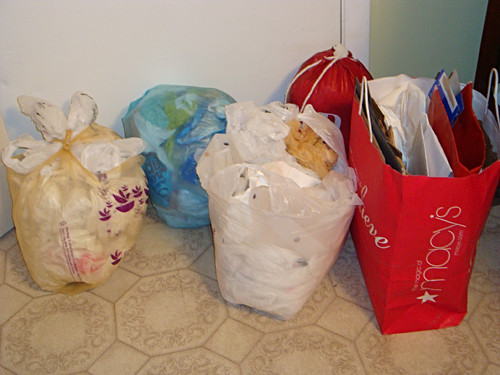


My mum keeps hers like this. Just stuff them all into a bag. Horrible way.


Or maybe you pack your plastic bags likes me! Fold the up into squares but have a hard time finding the right size and folding them back into the triangle 99% of the time.

Let me introduce you to a new way I found!


A bag to store your bags!

I bet you never thought of using a drawstring bag like this! It's like a bolster case for your bags~~

What's great about it is all you have to do is stuff the plastic bags from the top (no need for folding) and pull out from the bottom! If you get the wrong size, just stuff it back from the top! :)

Here is all you need:

1. 2 pieces of 45x27cm fabric
2. Piece of elastic (about 20cm)
3. Piece of cotton tape (about 60cm)
4. Safety Pin


Step 1: Sew the long sides and pin the two short sides in.


Step 2: Place the cloth inside out like shown below and sew the long sides. Do not sew past the stitch across along the short sides. Your drawstring will be put through there.


Step 3: Pin a safety pin at the end of the cotton tape so you can put through the short side.


Step 4: Continue on and take out the safety pin. Tie a knot to finish up your drawstring.


Step 5: On the other end of the bag, pin the safety pin to the elastic and put it through the hole on the other short side.


Step 6: Sew it and cut it! This will be your bottom end :)


And viola! Your very own plastic bag holder for easy access and easy storage! Absolutely love this because it hides all the disgusting and unsightly plastic bags!

And when you pull it out, its so easy because you will be stacking the bags on top one another, so you won't pull two at the same time.


You can hang it or put it lying down in your cupboard, takes up sooo little space! Have fun!

Tuesday, 2 October 2012

HAIR: Levels of Bleaching

With the trend of dip-dyeing, many people have questions about bleaching their hair. So here are some tips I picked up while researching and DIY-ing! :)

IDENTIFY YOUR HAIR LEVEL


Usually, as Asians, we are level 1-3. By bleaching we store-bought bleach (e.g. Gatsby Hi-Bleach, Palty Meca Flash), we are able to go down to until level 5-7. However, if your hair is dyed and treated, your hair might not go as light as non-treated hair.

Don't expect level 10 or level 12 (platinum blonde) in just one go if you have dark hair.

AFTER BLEACHING

Your hair turns yellow when you bleach it. Yes, YELLOOOWWWW. Or orange or gold depending on your hair condition and colour before you bleach it.


Usually when you bleach for the first time, it will be from level 5-9. You might have to bleach again to achieve level 8-10 if you want to put wild colours over it.

I reccomend using this bleach from Palty. It is so much better than Gatsby's. You can buy it from Watsons, not NTUC or guardian. Only Watsons carry this brand.
If your hair is too dry or damaged after the first bleach and you need a second bleach, you might have to wait for a day or more to let your hair rest. Deep condition your hair with a hair mask or treatment. If you don't have treatment products, you can apply Johnson & Johnson's baby oil every night before you sleep.

GET RID OF THE YELLOW TONE

The colour might be tooooooooooo yellow for you to walk around Singapore or you might want to put pastel colours on, so you need to get the base colour to as close to white.

You will need white toner (Manic Panic, La Riche, Special Effects etc) which you can get online on Ebay or local Facebook shops. It neutralises the brassy yellowness.


If you refer to the colour wheel above, purple neutralises yellow (opposite colours). So all the toners are purple. Don't be surprised if you recieve a purple tub.

On the other hand, I use a toner shampoo to do the trick. Because unlike the usual toner, you have to leave it on for about 15 minutes and it will wash out. Using a shampoo on the other hand, is super convenient and it won't wash out because you will be putting it on instead :D


So there! Remember to treat your hair after bleaching. If you are afraid, just go to a salon :)

Tuesday, 25 September 2012

Hair: Pink to Blonde

I've been wanting to change my pink hair to a lovely shade of teal, but since I would have to go blonde first, so why not enjoy it while it last before going green!

I'm going to try and DIY it myself!

STORY BEHIND MY DIY JOURNEY:
I went down to a salon at Thomson Plaza and the hair stylists were SUPER reluctant to do my hair (honestly, I think they just don't have experiences with bleaching/don't have confidence in their products). They were saying it is harmful to me and asking me to reconsider. In Europe/America, it is soo common to bleach their hair/maintain blonde.

So I called my old salon and they ROSE THEIR PRICE BY LIKE HALF. 2 months ago, I did my entire head for $180. Now to do my entire head, $340. What.

So here I am, recording my journey. Be it a success/mistake, let this be enlightening!

Here is my hair. I have pink hair for 2 months, maintaining it with Manic Panic's Hot Hot Pink! (Psst, I have a new tub of 1 Hot Hot Pink and 1 New Rose for sale at $15 each! Click here to see how to use!)


Here I used a box of Revlon Colorsilk, started from the bottom of my hair. Didn't have enough for the top sadly :( But the pink came off IMMEDIATELY. No bleaching at all!

So if you dip-dyed your hair with any funky colours, just grab a box from the supermarket and blob it on!


 Here is after the second box! I bleached my roots with Palty (didn't work so well because my sis and I suck at full coverage). I only let my hair rest for 1 day but the condition of it is WAY better than if you bleach it!

I will be looking for Colorsilk's Ultra Light Sun Blonde to continue lightening it! I can't seem to find it anywhere :( Will go lighter until I feel it's light enough for green!


Salon Cost: $300+ with bleaching
DIY Cost: $40+ with NO bleaching

Friday, 21 September 2012

Manic Panic's Hot Hot Pink

Hey!

So if you're here, you're probably interested in using the Manic Panic's hair dye. Or maybe you were just scrolling down. Haha.

First, some product awareness!


The product I alwayyyyyss use to colour on my hair is Manic Panic because of a various number of reasons. 

  1. Super easy to buy and fast shipping! (http://www.manicpanic.com)
  2. Cheap and affordable! About $20/tub at the website and you can just get the MOST darkest shade, dilute it with conditioner to make it as light as you want. AND ONE TUB WILL LAST FOREVEERRRR.
  3. Easy to remove, in case the colour turns out wrong or you have school ;)
  4. SUPER SMOOTH AFTER APPLICATION because it is just colouring, no dyes no nothing!


So here is the hair I have *cries*. Its yellow because of the bleaching. It happens to ALL dark haired people who bleach. Don't judge.


I'll be using Hot Hot Pink! I've used this tub about 3 times already. Depending on how dark you want your colour to be, you can use it for maximum 20 times if you are doing baby pink.


Filled a small container with conditioner. You need about half a container of conditioner to cover your entire head :) Remember to add dye into the conditioner. Which means dip the colour into the container of conditioner.


The first picture is after 1 dip with my comb after mixing.
The second picture is after 2 dips.
You can leave it on for as long as you want! I left it on overnight because it is super conditioning (Y)


Here is the result! :) You have to bleach your hair first, I recommend Palty's bleach available at Watsons rather than Gatsby's because it's less drying :) If you put it over black hair, you won't able to see it at all, not even a tint.

I have two new tubs of New Rose and Hot Hot Pink! New rose is more reddish pink, while Hot Hot Pink is more bright neon pink! I'll be selling it for $15 per tub! I can meet at Admiralty station ;) Do let me know if you are interested!


Tuesday, 11 September 2012

Easy DIY basic denim shorts!!

So... I've decided to upload early because I have found my perfect denim highwaist!

What so great about it you say?

Well, I'm somewhat a plus-size at my bottom :( I have huge thighs (like seriously huge) and calves :'( I have to wear shorts thats are 17" across. Most shorts from F21 are too tight around my thighs, though everywhere else is perfect.

So I was at NTUC Extra and I saw them selling men's jeans for like $10+ only. IT WAS SUPER CHEAP OK. I think its quite comparable to some of the more expensive shorts out there and the fit is PERFECT. Hahaha.

REASONS TO CUT HIGHWAISTS OUT OF MEN'S JEANS
  1. Perfect highwaist length!!
  2. More loose around thighs due to straight fit cut, instead of skinny jeans cut!
  3. They have my size! (I'm fat, so it's a plus point for me!)
So I went home to slice it, handwash it, tumble dry in dryer and it looks like this below!


 It frayed quite nicely even when I didn't do much! Just scrub at the area more to fray as much as you want! However, the white threads look weird, so I went to dye it black! You're able to get the fabric dye at a Home-fix store for $6+, able to dye 2-3 highwaists!


And tada! It didn't turn out black, more of a super dark greenish blue. But it was good enough!

You can dye it another colour to give it an OOMPH! But I wanted a basic denim shorts.


This is just a simple starting post! :) But shorts like these are so easy to make and you can customise the length too! I make mine longer because it looks fine for my body proportion. My sister wore it and it looked too long. Haha.

Monday, 10 September 2012

First Post!

Yo yo yo!
Super tired from handling a shop (click here to visit!), so decided to change it up to a blog instead! So help me clear all my stocks please~~

After I cleared all my stocks, I will be revealing all my DIY supply stores and so much more~~ 
Anyway, ta-ta! Will update after my finals next next week!